How to Make a Stairway Photo Wall Gallery
Learn how to make a stunning stairway photo gallery for your home! If I can do, you can, too! I'm not an interior designer, but I did come up with a simple plan that worked for me. I'll share my set-by-step tutorial with you in this post! 
The wall above our stairs sat empty, sad and forlorn for three and a half years. Not being a designer, I was so intimidated on how to fill it, and to do it right the first time so I didn't spend years cringing everytime I looked up there at something that looked like a kindergartner put it together (no offense to kindergartners!).
At first, I looked online to see if I could hire someone to do it for me. Sure! It can be done with designer frames and a perfect layout, for about $4,000. Yikes! I'd much rather spend that on a lifetime supply of wine and gourmet chocolate!
So, I mustered up my courage and just decided I had to go for it. The good news is, it was not hard or even all that technical!
How to Make the Gallery
Get the Frames
Go to your favorite frame shop and pick out a combination of large, medium and small frames. Add in some knick knacks to add some whimsy and personality. Like the first letter of your last name, or artwork, old doorknobs, sculptures, etc.
I got all of my frames from Kohl's (with my 30% off coupon!) and Ikea. I probably spent $100-$200 for all of the frames and extras. I am not a technical person, so I honestly didn't measure the wall before I went to buy the frames. I literally picked out whatever I liked and thought was pretty and didn't think too hard about it. My thought process was that if I got too many, I could just return them, especially to a place like Kohl's, Target, Wal-Mart or Michael's!

Lay Out the Frames on the Floor First
Then, measure your wall and mark the edges of the wall on the floor with masking tape. Do your best to measure the angle, but a typical stairway is 45-50 degrees. I laid out my measuring tape straight on the floor, perpendicular to an edge of the room, and then moved it about 45 degrees up. It was not perfect at all, but it didn't need to be and totally worked!
Then, play with your fames and move them around until you get them in the order and layout that you want. I did mine below my stairwell so I could look down over it from far away and see if I liked it from a distance.

The Secret Trick – Wrapping Paper!
Next, leaving your frames on the floor, trace them onto some cheap wrapping paper and cut out. Two important tips – trace also the nail holes. This is the secret sauce to make it super duper easy!
Make sure to label the traced frames so you can match them to the correct frame or you'll forget once you put them on the wall (Believe me, I know. It took me twice as long because I had a pile of papers and didn't know which frames they went with!). One idea is to take some garage sale circle sticker thingies (you know, with those bright neon colors?), and put a number on each frame and a matching number on the paper. Use that ole' knocker!
Then, arrange the papers on the wall with some scotch tape. Once on the wall, you may want to move them around again (which is why it's so important to label them).
I honestly didn't measure the distance between each picture because that made my brain hurt! Instead, I did the best I could then stood back several times and see how it looked from a distance. Having a partner at this stage really helps so you can tell them where to move them (or bug them to death – “A little bit to the right, no wait, I meant left! Yeah, that's it. No wait, just a tad down. No, I said a tad, not a foot!”).
Mark the Nail Holes through the Paper
So this is the brilliant part that makes it so easy – mark the picture location by nailing or screwing through the traced holes. Then you can rip the papers off of the wall, and start hanging!
Here is the finished result! It took us about two hours from start to finish, if you don't include all of the baby and children interruptions we had.
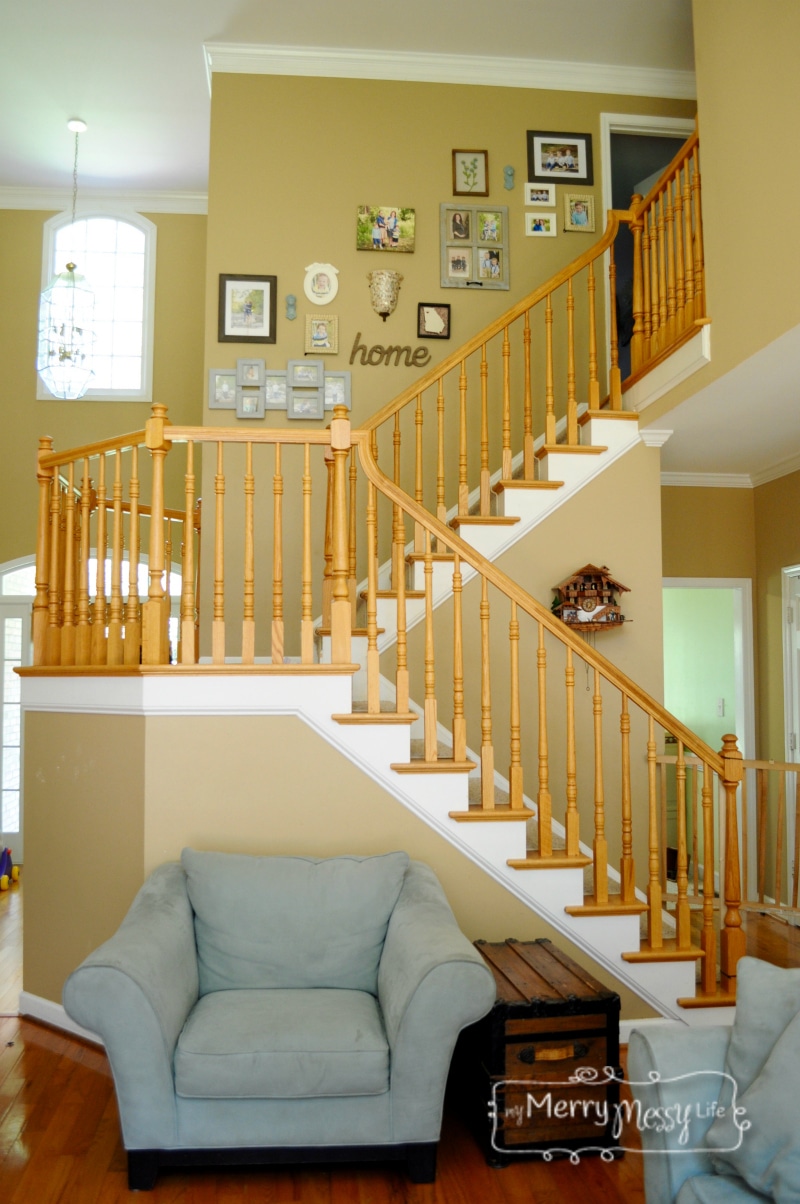
I am so pleased with the results and this wall now makes me smile every time I look at it! I'm inspired to created a gallery in my living room now.
I hope this helps you to create your own. If I can do it, as a totally un-interior designer, I think you can, too!