Crochet Crocodile Stitch Tutorial {part 1 of 2}
A step-by-step full photo tutorial of how to work the crochet crocodile stitch. This is a complicated stitch, but makes a beautiful pattern. It adds a third dimension to your crochet projects!

I used this stitch to create an adorable clutch! This stitch was quite tricky for me at first, and I had to really study several YouTube videos to figure it out. I really wanted a nice photo tutorial because videos drive me crazy – it's so hard to rewind and impossible to watch in slow motion. So, if you also prefer photo tutorials, then you are in luck!
This is quite a tricky stitch, so I've broken it down in two parts. When you're done with this one, go to part 2!
Crocodile Stitch Tutorial
Step #1
Make a chain however long you want, as long as it's multiples of 6. For a clutch, I made a 36 chains.
- In the third chain from the hook, work 2 half double crochets (in the same chain).
- Chain 1, skip 2 chains and work 1 half double crochet.
- *Chain 1, skip 2 chains and work 2 half double crochets in the same chain.
- Chain 1, skip 2 chains and work 1 half double crochet.*

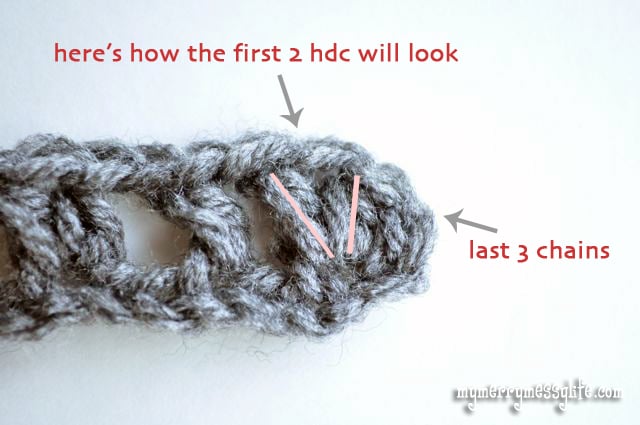
Here's how the first 2 half double crochet will look, with the last 3 chains.
Step #2:
On the first of the two half double crochets, work 4 half double crochets from top to bottom.

Step #3:
Turn your work upside down and work 4 more half double crochets on the last of the set of 2 half double crochets from bottom (of the work) to the top.
 Here's how step #3 will look after you've worked 2 of the half double crochets.


Once you finish step #3 and turn your work right side up, the first completed crocodile stitch will look like this!

Step #4:
Work a slip stitch on the next single half double crochet.

Step #5:
Start the next crocodile stitch on the next pair of half double crochets by crocheting 4 half double crochets on the first post closest to your right hand and from top to bottom. Then, just like in step #3, turn your work upside down and work 4 more half double crochets on the second post.

Completed step #5 – now you've finished two crocodile stitches!

Continue working steps #2 to #4 for the length of your work, working a crocodile stitch on each pair of half double crochets and a slip stitch on each single half double crochet. You will end with a crocodile stitch and it should look like this!

Now, head on over to part two to finish the project!
[optin-monster slug=”xs2yggdkacqf5ww9fqqm”]
Thank you for sharing the pattern I used the crocodile stitch for a top of a baby mermaid tail cocoon
Oh this pattern is PERFECT for a mermaid tail! I bet it looks gorgeous!
Me gustaría conocer más acerca de este punto , cómo empezarlo, lo conocía como punto wogly o algo así, puedes instruirme por favor
Very much thanks for clear explanation.