Free Crochet Christmas Star Garland Pattern
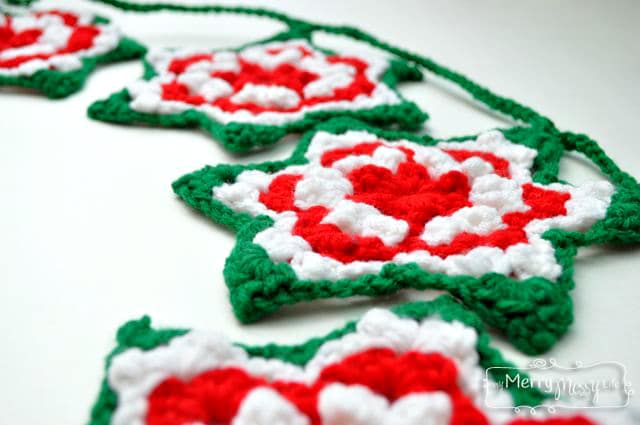
Here's a beautiful, free crochet Christmas Star garland you can make for the holidays!

Christmas has arrived on our mantel with the creation of this adorable crochet Christmas star garland pattern! I've includeda free pattern and photo tutorial so you can make one, too.
This Christmas Bunting Uses the Granny Stitch
I'm so happy with the way it turned out, after many tries to get it just right, of course. I made one larger stitch in between each smaller stitch which creates a pucker effect, so the star puffs up and has a lot of texture. The possibilities for colors are endless, so you can make it to match your own Christmas decor! It would also look lovely draped on a staircase, down a hallway, or hanging from a door.
This crochet Christmas star garland pattern is made using the Granny Stitch, so it works up pretty quickly. Once I got the hang of it, I could make one in about 45 minutes. I used all Red Heart Super Saver Yarn because I find it's perfect for making crafts like this, where you need strong acrylic yarn that isn't soft so it stands out straight.
See all of my other free granny stitch patterns here!
Free Crochet Christmas Star Garland Pattern
By Sara McFall of My Merry Messy Life
Abbreviations
- CH = chain
- SC = single crochet
- HDC = half double crochet
- DC = double crochet
- TC = triple or treble crochet
- SL ST = slip stitch
Materials
- Hook: H
- Yarn: Worsted – I used all Red Heart Super Saver Yarn in White, Cherry Red, and Paddy Green
- Tapestry Needle to sew in tails
- Sharp scissors to cut yarn

Pattern
Here's the pattern for the crochet Christmas star garland!
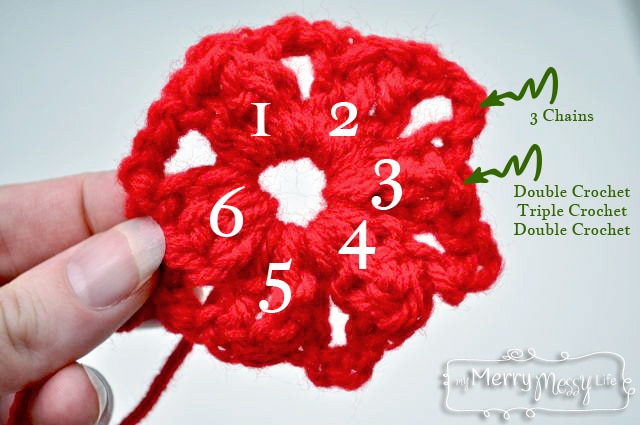
Round 1 – Cherry Red:
- CH 6. SL ST to form a circle.
- *DC, TC, DC ,CH 3 repeat from * 5 more times, total of 6 granny stitches. Fasten off.
Round 2 – White:
- You will work 2 granny stitches and a CH 3 on each red CH 3, which is also between the red granny stitches.
- In any CH 3 space, join with a SL ST, CH 3 or just work a DC onto it.
- TC, DC. CH 3.
- DC, TC, DC
- *In the next CH 3 space, work DC, TC, DC – CH 3 – DC, TC, DC.
- Repeat from * all the way around until you have 12 granny stitches. Join to the beginning CH 3 or DC with a SL ST. Fasten off.
Round 3 – Cherry Red:
- Again, like round 2, you will work 2 granny stitches and a CH 3 on each white CH 3, which is also between the white granny stitches. But this round, you will add an additional CH 1, 2 SC, CH 1 in between the sets of white granny stitches.
- In any CH 3 space, join with a SL ST, CH 2 or just work a DC onto it.
- 2 HDC, CH 3 3 HDC
- CH 1. Then, in the next space, which is in between the 2 sets of granny stitches, work 2 SC, then CH 1.
- *In the next CH 3 space, work 3 HDC, CH 3, 3 HDC
- CH 1. In the next space, work 2 SC, CH 1.*
- Repeat from * all the way around until you have worked 12 granny stitches.
- Join to the beginning CH 2 or HDC with a SL ST. Fasten off.
Round 4 – White
- To begin this round, work a SL ST, CH 1 into any 2 SC space (this counts as your first SC), then work a SC, CH 2
- *In the next CH 3 red space, work SC, DC, SC, CH 3 and then SC, DC, SC again
- CH 2, 2 SC in the space in between the red SC stitches, CH 2*
- Repeat from * all the way around until you have worked 12 granny stitches and 12 SC stitches
- Join to the beginning SL ST with a SL ST. Fasten off.
Round 5 – Green
- To begin this round, work a SL ST, CH 1 into any 2 SC space (this counts as your first SC), then work a SC, then CH 3
- *In the next CH 3 space (that's in between the 2 clustered white stitches), work 2 SC, then a picot stitch {SC, Ch 3, SL ST back in the first CH, SC}, then 2 SC
- CH 3
- 2 SC in the next white SC space*
- Repeat from * all the way around until you have worked 12 granny stitches, 12 SC stitches, and 6 picot stitches
- Join to the beginning SL ST with a SL ST. Fasten off.
How to Make it into a Garland
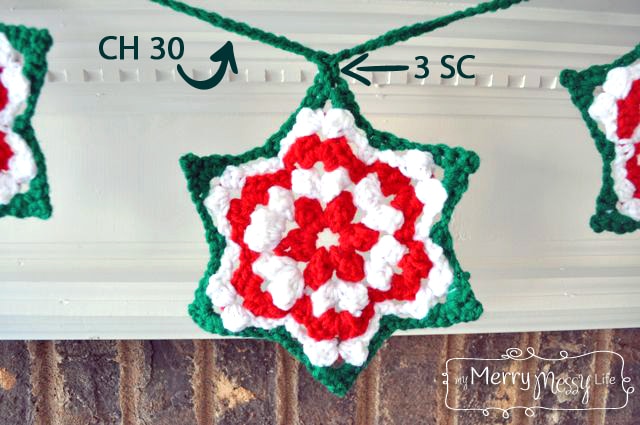
Here's how to make piece the crochet Christmas star garland into the garland!
- *CH 30.
- Work 3 SC onto one of the picot points of one star.
- CH 30.*
- Repeat from * until you have joined all the stars together.
- For my mantel, I needed 9 to 10 stars to stretch all the way across and my mantel is 78 inches (198 CM) long. I say 9 to 10, because it's 9 if I show the first and last CH 30, but 10 if I hide or don't do the first and last CH 30.
Hope you enjoyed making this crochet Christmas star garland pattern! Merry Crocheting and Merry Christmas!
Check Out My Other Holiday Posts on the Blog
If you liked this free crochet Christmas star garland pattern, you might also like:
- Free Crochet Pattern for a Christmas Star Ornament
- Christmas in July – Free Crochet Pattern Roundup
- Free Crochet Pattern for a Christmas Tree Skirt
- 10 Holiday Diffuser Recipes
- 6 Holiday Room Spray Recipes using Essential Oils
- Healthy Peppermint Mocha Creamer Recipe
- Peppermint Mocha Sugar Scrub Recipe
[optin-monster slug=”xs2yggdkacqf5ww9fqqm”]
This is so striking that it caught my eye quickly as I was looking for a quick idea to spruce up my door wreath. I love how easy and quick it is to make up and also am going to use just the red and white flower for other projects. Thank you for sharing your talents. Be well and Merry Christmas.
Hi Trudy! How’d the pattern end up working out for you? So glad it was just what you needed.
Thank you for the cute star pattern. I hope I have time to make some for Christmas!
You’re welcome! Hope you enjoy making it! If you’re on Instagram and you do make it, you can tag me @mymerrymessylife so I can see your finished product!
Where do I find rows 4 – 6 please?
Hi Nancy! That is SO bizarre! I’ve had this post on the blog for years and now the last 2 rows are missing. I rewrote them just now and you can now finish it. So sorry about that! They just went POOF!
Where are the instructions for rows 4 – 6?
Hi Christine! That is SO bizarre! I’ve had this post on the blog for years and now the last 2 rows are missing. I rewrote them just now and you can now finish it. So sorry about that! They just went POOF!
Very pretty but the instructions for the garland don’t match the picture
Hi Angela! Which part doesn’t match up? As of the time you wrote this comment, 2 of the rounds were missing. Is that what you mean? I’ve now added them back. They literally went poof, it was bizarre! But it’s all fixed now.
Idk what I did wrong but this didn’t work for me. First, the chain 1 in round 3 didn’t make it across the gap & things started scrunching up. I switched it to chain 3 and it seemed OK. I continued on to round 4 buuut, it definitely wasn’t a star, it was a triangle ? Any advice?