Newborn Baby Boy Puff Stitch Crochet Hat – Free Pattern
I've gone to town crocheting for our family's new arrival – our third boy! As much as I love flowers and pretty girlie things, I'm so used to having boys that I've learned how to make “pretty” things for them, too, and this hat and layette set has to be at the top of my favs list. Here's a free crochet pattern for a puff stitch baby beanie – just change out the colors if you need it for a girl!

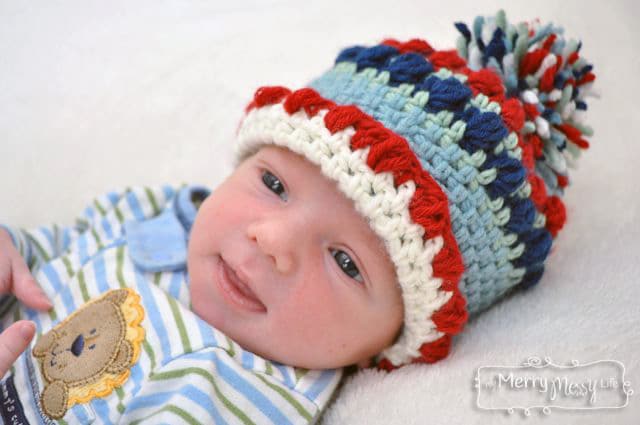
This hat measures 5 inches tall, by 7 inches wide. Just like all my hat patterns, I use my handy-dandy hat sizing and measurement post when crocheting hats so I can make sure it’s the correct size while I’m in the middle of making it. This hat can be made to any size by continuing to make increasing rounds to the crown.
Written and Designed by Sara of My Merry Messy Life ©2013
(Please see my Legal page for more copyright details)
Materials
- Yarn: Martha Stewart Crafts from Lion Brand Yarn – Extra Soft Wool Blend in Sailor Blue, Holly Berry, Winter Sky, Buttermilk, Green Eucalyptus
- Hook: H, 5 mm
- Tapestry needle to sew in tails
Abbreviations
- CH = chain
- HDC = half double crochet
- ST = stitch
- SL ST = slip stitch
(Read my other post, “How to Work in the Round“, for more help)
Make this hat as part of a layette set with my free crochet pattern for the raspberry stitch baby cocoon and, half double crochet hat, and the mitered granny square blanket!

Pattern for Newborns (13-15 inch head)
The Crown
(Made with Winter Sky) CH 3, SL ST to form a ring
Round 1
- CH 2 (counts as first HDC), 11 HDC in ring (12 HDC total)
- SL ST to top of CH 2
Round 2
- CH 2 (counts as first HDC), 1 HDC in same space
- 2 HDC in each space around (24 HDC total)
- SL ST to top of CH 2
Round 3
- CH 2 (counts as first HDC), 1 HDC in same space
- 1 HDC in each of the next 2 spaces
- *2 HDC in the next space
- 1 HDC in each of the next 2 spaces (32 total)
- SL ST to top of CH 2
Round 4
- CH 2 (counts as first HDC)
- 1 HDC in each space around (32 total)
- SL ST to top of CH 2
Round 5
- CH 2 (counts as first HDC), 1 HDC in same space
- 1 HDC in each of the next 6 spaces
- *2 HDC in the next space
- 1 HDC in each of the next 6 spaces*
- Repeat from * all the way around (38 HDC total)
- SL ST to top of CH 2
The Sides
Round 6 – Puff Stitch (never done the puff stitch before? Click here to see my photo tutorial!)
Switch to another color – I did Holly Berry
- CH 2 (counts as first HDC)
- *Puff stitch in the next stitch, HDC in the next
- Repeat from * all the way around (19 puff stitch worked, 19 HDC worked)
- SL ST to top of CH 2
Round 7
Switch to another color – I did Green Eucalyptus
- CH 2
- 1 HDC in each space (38 HDC total)
- SL ST to top of CH 2
Round 8 – Puff Stitch – repeat Round 6
Switch to another color – I did Sailor Blue
Round 9 – Repeat row 7
Rounds 10-14 – Repeat Row 7, changing back to Winter Sky
The Cuff
Flip the hat inside out and work on the inside of the hat, so your puff stitch will be facing out once the cuff is flipped up.
Rounds 15-17 – Repeat Row 7, changing to Buttermilk
Round 19 – Repeat row 6, changing to Holly Berry
The Pom Pom
I learned how to make pom-poms from this video but modified by wrapping it over my fingers instead of a piece of cardboard. I held strands of all the colors and wrapped them over my four fingers (not the thumb). Then I pulled it off my fingers and then tied a strand around the middle, then cut the looped ends until it's nice and round. One of these I'll post a tutorial for you!