The Oil Cleansing Method – Natural Face Cleansing & Moisturizing
The Oil Cleansing Method has allowed me to ditch face soap, lotion and even makeup remover and my skin has never been happier! That's what I love about natural products – many of them have multiple uses and keep my medicine cabinet clutter-free. Not only that, this method is totally safe with no toxins, sulfates, chemicals and despite popular belief, oil does not clog up the pores with oil. You can blame clogged pores on hormones, bacteria and dirt and this method effectively cleans the latter two and moisturizes at the same time.

I've been using the Oil Cleansing Method for 8 Years!
After my face lotion finally ran out two months ago, I vowed I was going to try this method and stop buying face lotion and soap for good. Here I am many years later, and the Oil Cleansing Method is STILL how I wash my face and remove makeup! Cosmetics, and especially lotions, are known for being loaded with unwanted garbage that I'd rather not have on my face.
I learned from my good blogging buddy, Sarah, from Nature's Nurture what it is and exactly how it works.
How it Works: Oil Dissolves Oil
According to theoilcleansingmethod.com, the basic concept is that oil dissolves oil, so applying oil to the face removes dirt, makeup, and oil and leaves the face cleaned and moisturized. I found that it's the same concept for cleaning the hair, like in my no-poo post where I discuss how traditional shampoos, which contain synthetic detergents called sulfates, strip the scalp of its natural oils and cause the scalp to overproduce oil to compensate. This creates a vicious cycle wherein you need more shampoo and daily cleaning to remove the excess oil, thus drying out the hair and requiring a conditioner. Once you start cleaning the scalp and hair with a shampoo that doesn't contain those sulfates, the scalp returns to its natural state and produces the correct amount of oil, and doesn't need daily cleaning.
Sulfates Bad, Oil Good
So the same concept applies to our skin. Sulfates in body washes and face soaps strip our skin of sebum, our skin's natural oil, causing our skin to be dry and to overproduce oil. Little do most of us know that our skin naturally regulates perfect oil production, but we remove its ability to do so when we disrupt the balance with artificial chemicals like sulfates.
How to Make Your Customized Oil
Are you ready to try the oil cleansing method yet? Great! It's very simple, and you might even feel like you're in a spa.
Oils Needed:
- Castor Oil – key ingredient, a must-have because it dries and cleanses.
- Other carrier oil like: Extra Virgin Olive Oil, Sunflower Oil, Jojoba Oil, Sweet Almond Oil, or Grapeseed Oil
- UPDATE – After making my own room deodorizing spray, I decided I wanted my face oil to smell as wonderful as the spray, so I added 2 drops each of Rosemary, Cedarwood, and Lavender essential oils. Frankincense is excellent for supporting skin health as it heals sun spots blemishes, but you might want something sweet like Ylang Ylang, Geranium, Grapefruit, or Sweet Orange to sweeten up the scent (where to buy high-quality essential oils). The result is AH-mazing! It smells divine and I really enjoy washing my face now because it truly feels like a facial. PLUS, my face was even more moisturized and soft.
How to Pick The Right Ratio For Your Skin Type
The basic concept of the oil cleansing method is that oily skin needs more Castor Oil, and drier skin needs less. My skin is on the dry side, so I've found I need 1:4 ratio of 1 part Castor Oil and 4 parts other oils. I have used Sunflower, Olive, and Sweet Almond Oils and honestly don't notice much of a difference between the three, so I now just use whatever I've got in my cabinet at the time. Each person is so different, so I suggest experimenting until you get the perfect combination.
- Oily Skin – 1 part Castor Oil to 2 parts other oil, or 30% Castor Oil and 70% other oils
- Combination Skin – 1 part Castor Oil to 4 parts other oil, or 20% Castor Oil and 80% other oils
- Dry Skin – 1 part Castor Oil to 9 parts other oil, or 10% Castor Oil to 90% other oils
The Fun Spa Part – Clean Your Face with Steam and Oil
Here's how I do it, and there's no right or wrong way as long as you use steam to open up the pores. I like to do it at night, but in the morning, I generally do nothing because splashing water on my face dries out my skin.
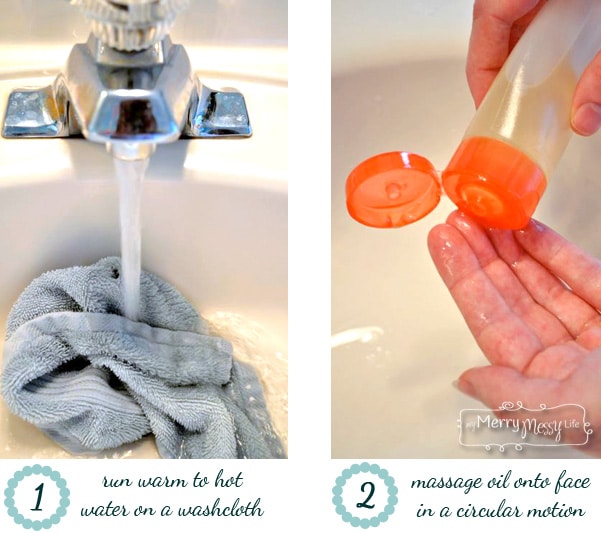
- Take a washcloth, place it in the sink, and turn on the faucet to warm.
- While waiting for the water to get very warm, take a small amount of oil onto the fingers and rub until it becomes warm.
- Apply the oil to your face and massage in a circular motion to loosen dirt, oil, and makeup. I like to take a moment to enjoy the massage, too!
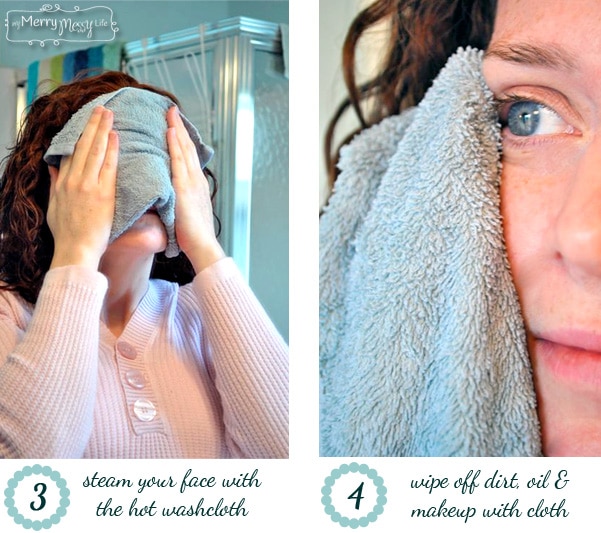
- Check to see that the washcloth is very warm but not hot and scalding, of course.
- Squeeze out the water and drape it over your face. Here is where I practice my deep yogic breathing and concentrate on relaxing and clearing my mind of the day's stresses. Leave it on as the steam opens your pores, then remove it once it cools to room temperature.
- Use the washcloth to wipe your face – this removes the dirt, oil, bacteria, and makeup trapped in your pores.
- Repeat if desired, which I always do.
- If your face still feels dry (if it's wintertime, this is a possibility), just take a dab of oil and massage it into the skin as a moisturizer. You'll know it's too much if your face is shiny and oily.
Two to Three-Day Transition Period
Just like when you transition to using sulfate-free shampoos, your skin will have to adjust to producing less oil for a few days. Remember, it is used to overproduce oil because soap strips it of the layer of sebum. For me, the transition period lasted only two days, and my skin broke out into pimples. After all the impurities had come to the surface, my face returned to normal again on the third day. So, I suggest trying this method on the weekend when you won't have to go to work (or whenever you have a few days off).
Other Natural Beauty Recipes
If you liked this oil cleansing method post, consider being a My Merry Messy Life insider below, and you'll get a free eBook on how to go natural in your home! Also, check out these posts.
[optin-monster slug=”xs2yggdkacqf5ww9fqqm”]
Hi Sarah,
I just found your amazing blog! I really like your recipe! Three years ago I developed chemical sensitivities and allergies in general. Was perfectly healthy before then. This forced me to make my home as toxic free as possible. Because of that, I may be more ware than some about chemicals. In this recipe I noticed that you are storing this oil recipe in a PLASTIC tube. While this may be convenient, that plastic tube contains chemicals that not only leach into the air, thus breathing in those toxins, but into the product it contains. Even when using a glass container, some come with plastic tops 🙁 I am currently looking for metal tops, especially with a pump. It is very difficult to not be surrounded by toxins as they are everywhere. The best we can do is to eliminate as much as we can. I applaud your efforts to help others and educate-thank you! It is much needed!
Hi Janice! Thanks so much for your comment and for stopping by! Yes I agree, it’d be great to have bottles with steel or glass straws but I’ve never seen them before. They’d probably be quite expensive as those are tiny parts and would also be breakable. I’ve found that as long as the plastic is BPA free, it’s pretty safe. And if you’re using essential oils it’s necessary to get bottles that have HDPE or PETE written on the bottom of them so the essential oils don’t break down the plastic.