Free Crochet Moose Beanie Pattern
A free crochet moose beanie pattern that is adorable and yet classy It's perfect for a costume or just to have a fun accessory during the winter months. It comes in all sizes, from newborn to adult!
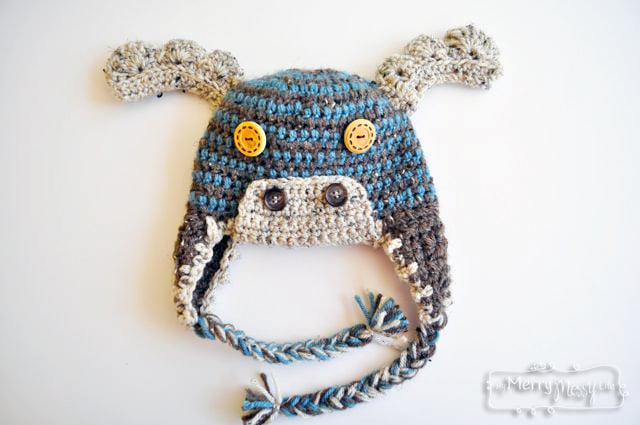
I Made This for a Halloween Costume!
Here is the third pattern in my Halloween series with Lion Brand Yarn, and this time it's a classy moose! My oldest son came up with all these creatures for him and his brother – he (Gabe) is a fox, Grayson is a lion, and our youngest, newest member of the family (he's 8 months) is the moose.
We've even taken the opportunity to learn about these animals by reading, coloring, learning the letters and making crafts related to each animal. Plus, it's the hat for all of their Halloween costumes this year so it's a two birds with one stone kinda deal.
Free Crochet Moose Beanie Pattern
Materials:
- Vanna’s Choice Yarn by Lion Brand in barley (the brown), wheat (hat), and dusty blue (hat)
- Hook (unless otherwise stated for the face pieces): H, 5.0 mm
- Scissors
- Tapestry needle to sew on pieces and sew in tails
Crochet Stitch Tutorials to Help You
- How to Work In the Round – if you’ve never done a hat before, one skill that’s needed is to be able to work in the round. I have a complete photo tutorial to guide you all the way!
- Increasing and Decreasing – to make the triangle eyes and the ear flaps, you’ll need to know how to work a decreasing stitch. Check out my full photo tutorial to learn it!
- Hat Measurements for Crochet and Knit – if you know the exact size of the head for which you are making the hat, you might be better off using my sizing guide to make the perfect fit.
Newborn to 3 months
Round 1
- CH 3, SL ST to form a ring
- CH 2 (counts as first HDC)
- 7 HDC in ring, SL ST to top of beginning CH 2 (8 HDC total)
Round 2
- CH 2 (counts as first HDC)
- 1 HDC in same space
- 2 HDC in each space around
- SL ST to top of beginning CH 2 (16 HDC total)
Round 3
- CH 2 (counts as first HDC)
- 1 HDC in same space
- 1 HDC in next space
- *2 HDC in next space
- 1 HDC in next space
- Repeat from * all the way around
- SL ST to top of beginning CH 2 (24 HDC total)
Round 4
- CH 2 (counts as first HDC)
- 1 HDC in same space
- 1 HDC in each of the next 2 spaces
- *2 HDC in next space
- 1 HDC in each of the next 2 spaces
- Repeat from * all the way around
- SL ST to top of beginning CH 2 (32 HDC total)
Round 5
- CH 2 (counts as first HDC)
- 1 HDC in same space
- 1 HDC in each of the next 3 spaces
- *2 HDC in next space
- 1 HDC in each of the next 3 spaces
- Repeat from * all the way around
- SL ST to top of beginning CH 2 (40 HDC total)
Round 6 (work an increasing stitch just 2 times this round, doesn’t matter where)
- CH 2 (counts as first HDC)
- 1 HDC in same space
- 1 HDC in each of the next 19 spaces
- 2 HDC in next space
- 1 HDC in each of the next 19 spaces
- SL ST to top of beginning CH 2 (42 HDC total)
Done with the crown!
The Sides: Rounds 7-17
(or keep working rounds until the hat is about 6 inches tall)
- CH 2 (or mark with a stitch marker and eliminate the CH 2 and SL ST at the end of the round, in other words, work a continual round)
- 1 HDC in each space around
- SL ST to top of CH 2 (42 HDC total)
Rounds 14-17 change to white and continue with 1 HDC in each space
3 to 6 months
Here's the free crochet moose beanie pattern for 3-6 month olds.
Round 1
- CH 3, SL ST to form a ring
- CH 2 (counts as first HDC)
- 7 HDC in ring, SL ST to top of beginning CH 2 (8 HDC total)
Round 2
- CH 2 (counts as first HDC)
- 1 HDC in same space
- 2 HDC in each space around
- SL ST to top of beginning CH 2 (16 HDC total)
Round 3
- CH 2 (counts as first HDC)
- 1 HDC in same space
- 1 HDC in next space
- *2 HDC in next space
- 1 HDC in next space
- Repeat from * all the way around
- SL ST to top of beginning CH 2 (24 HDC total)
Round 4
- CH 2 (counts as first HDC)
- 1 HDC in same space
- 1 HDC in each of the next 2 spaces
- *2 HDC in next space
- 1 HDC in each of the next 2 spaces
- Repeat from * all the way around
- SL ST to top of beginning CH 2 (32 HDC total)
Round 5
- CH 2 (counts as first HDC)
- 1 HDC in same space
- 1 HDC in each of the next 3 spaces
- *2 HDC in next space
- 1 HDC in each of the next 3 spaces
- Repeat from * all the way around
- SL ST to top of beginning CH 2 (40 HDC total)
Round 6
- CH 2 (counts as first HDC)
- 1 HDC in same space
- 1 HDC in each of the next 9 spaces
- *2 HDC in the next space
- 1 HDC in each of the next 9 spaces
- Repeat from * all the way around
- SL ST to top of beginning CH 2 (44 HDC total)
Done with the crown!
The Sides: Rounds 7-20
(or keep working rounds until it’s about 7 inches tall)
- CH 2 (or mark with a stitch marker and eliminate the CH 2 and SL ST at the end of the round, in other words, work a continual round)
- 1 HDC in each space around
- SL ST to top of CH 2 (44 HDC total)
Rounds 17-20 change to white and continue with 1 HDC in each space
6-12 Months (16 to 18 inch head)
Round 1
- CH 3, SL ST to form a ring
- CH 2 (counts as first HDC)
- 7 HDC in ring, SL ST to top of beginning CH 2 (8 HDC total)
Round 2
- CH 2 (counts as first HDC)
- 1 HDC in same space
- 2 HDC in each space around
- SL ST to top of beginning CH 2 (16 HDC total)
Round 3
- CH 2 (counts as first HDC)
- 1 HDC in same space
- 1 HDC in next space
- *2 HDC in next space
- 1 HDC in next space
- Repeat from * all the way around
- SL ST to top of beginning CH 2 (24 HDC total)
Round 4
- CH 2 (counts as first HDC)
- 1 HDC in same space
- 1 HDC in each of the next 2 spaces
- *2 HDC in next space
- 1 HDC in each of the next 2 spaces
- Repeat from * all the way around
- SL ST to top of beginning CH 2 (32 HDC total)
Round 5
- CH 2 (counts as first HDC)
- 1 HDC in same space
- 1 HDC in each of the next 3 spaces
- *2 HDC in next space
- 1 HDC in each of the next 3 spaces
- Repeat from * all the way around
- SL ST to top of beginning CH 2 (40 HDC total)
Round 6
- CH 2 (counts as first HDC)
- 1 HDC in same space
- 1 HDC in each of the next 4 spaces
- *2 HDC in next space
- 1 HDC in each of the next 4 spaces
- Repeat from * all the way around
- SL ST to top of beginning CH 2 (48 HDC total)
Done with the crown!
The Sides: Rounds 7-23
(or keep working rounds until it’s about 7.5 inches tall)
- CH 2 (or mark with a stitch marker and eliminate the CH 2 and SL ST at the end of the round, in other words, work a continual round)
- 1 HDC in each space around
- SL ST to top of CH 2 (48 HDC total)
Rounds 19-23 change to white and continue with 1 HDC in each space
Toddler – 12 Months to 3 Years
Here's the free crochet moose beanie pattern for toddlers!
Round 1
- CH 3, SL ST to form a ring
- CH 2 (counts as first HDC)
- 9 HDC in ring, SL ST to top of beginning CH 2 (10 HDC total)
Round 2
- CH 2 (counts as first HDC)
- 1 HDC in same space
- 2 HDC in each space around
- SL ST to top of beginning CH 2 (20 HDC total)
Round 3
- CH 2 (counts as first HDC)
- 1 HDC in same space
- 1 HDC in next space
- *2 HDC in next space
- 1 HDC in next space
- Repeat from * all the way around
- SL ST to top of beginning CH 2 (30 HDC total)
Round 4
- CH 2 (counts as first HDC)
- 1 HDC in each space around
- SL ST to top of beginning CH 2 (30 HDC total)
Round 5
- CH 2 (counts as first HDC)
- 1 HDC in same space
- 1 HDC in each of the next 2 spaces
- *2 HDC in next space
- 1 HDC in each of the next 2 spaces
- Repeat from * all the way around
- SL ST to top of beginning CH 2 (40 HDC total)
Round 6
- CH 2 (counts as first HDC)
- 1 HDC in each space around
- SL ST to top of beginning CH 2 (40 HDC total)
Round 7
- CH 2 (counts as first HDC)
- 1 HDC in same space
- 1 HDC in each of the next 3 spaces
- *2 HDC in next space
- 1 HDC in each of the next 3 spaces
- Repeat from * all the way around
- SL ST to top of beginning CH 2 (50 HDC total)
Done with the crown!
The Sides: Rounds 8-25
(or keep working rounds until it’s about 8 inches tall)
- CH 2 (counts as first HDC)
- 1 HDC in each space around
- SL ST to top of beginning CH 2 (50 HDC total)
Rounds 21-25 change to white and continue with 1 HDC in each space
Child Size – 3-10 Years
Round 1
- CH 3, SL ST to form a ring
- CH 2 (counts as first HDC)
- 9 HDC in ring, SL ST to top of beginning CH 2 (10 HDC total)
Round 2
- CH 2 (counts as first HDC)
- 1 HDC in same space
- 2 HDC in each space around
- SL ST to top of beginning CH 2 (20 HDC total)
Round 3
- CH 2 (counts as first HDC)
- 1 HDC in same space
- 1 HDC in next space
- *2 HDC in next space
- 1 HDC in next space
- Repeat from * all the way around
- SL ST to top of beginning CH 2 (30 HDC total)
Round 4
- CH 2 (counts as first HDC)
- 1 HDC in each space around
- SL ST to top of beginning CH 2 (30 HDC total)
Round 5
- CH 2 (counts as first HDC)
- 1 HDC in same space
- 1 HDC in each of the next 2 spaces
- *2 HDC in next space
- 1 HDC in each of the next 2 spaces
- Repeat from * all the way around
- SL ST to top of beginning CH 2 (40 HDC total)
Round 6
- CH 2 (counts as first HDC)
- 1 HDC in same space
- 1 HDC in each of the next 3 spaces
- *2 HDC in next space
- 1 HDC in each of the next 3 spaces
- Repeat from * all the way around
- SL ST to top of beginning CH 2 (50 HDC total)
Round 7
- CH 2 (counts as first HDC)
- 1 HDC in same space
- 1 HDC in each of the next 4 spaces
- *2 HDC in next space
- 1 HDC in each of the next 4 spaces
- Repeat from * all the way around
- SL ST to top of beginning CH 2 (60 HDC total)
Done with the crown!
The Sides: Rounds 8-25
(or keep working rounds until the hat is about 8 inches tall)
- CH 2 (counts as first HDC)
- 1 HDC in each space around
- SL ST to top of beginning CH 2 (60 HDC total)
Rounds 20-25 change to white and continue with 1 HDC in each space
Pre-Teens and Teens
Round 1
- CH 3, SL ST to form a ring
- CH 2 (counts as first HDC)
- 9 HDC in ring, SL ST to top of beginning CH 2 (10 HDC total)
Round 2
- CH 2 (counts as first HDC)
- 1 HDC in same space
- 2 HDC in each space around
- SL ST to top of beginning CH 2 (20 HDC total)
Round 3
- CH 2 (counts as first HDC)
- 1 HDC in same space
- 1 HDC in next space
- *2 HDC in next space
- 1 HDC in next space
- Repeat from * all the way around
- SL ST to top of beginning CH 2 (30 HDC total)
Round 4
- CH 2 (counts as first HDC)
- 1 HDC in each space around
- SL ST to top of beginning CH 2 (30 HDC total)
Round 5
- CH 2 (counts as first HDC)
- 1 HDC in same space
- 1 HDC in each of the next 2 spaces
- *2 HDC in next space
- 1 HDC in each of the next 2 spaces
- Repeat from * all the way around
- SL ST to top of beginning CH 2 (40 HDC total)
Round 6
- CH 2 (counts as first HDC)
- 1 HDC in same space
- 1 HDC in each of the next 3 spaces
- *2 HDC in next space
- 1 HDC in each of the next 3 spaces
- Repeat from * all the way around
- SL ST to top of beginning CH 2 (50 HDC total)
Round 7
- CH 2 (counts as first HDC)
- 1 HDC in same space
- 1 HDC in each of the next 4 spaces
- *2 HDC in next space
- 1 HDC in each of the next 4 spaces
- Repeat from * all the way around
- SL ST to top of beginning CH 2 (60 HDC total)
Round 8
Work an increasing stitch only 5 times this round (an increasing stitch is 2 HDC in one stitch).
- CH 2 (counts as first HDC)
- 1 HDC in same space
- 1 HDC in each of the next 11 spaces
- *2 HDC in next space
- 1 HDC in each of the next 11 spaces
- Repeat from * all the way around
- SL ST to top of beginning CH 2 (65 HDC total)
Done with the crown!
The Sides: Rounds 9-28
(or keep working rounds until the hat is about 9 inches tall)
- CH 2 (counts as first HDC)
- 1 HDC in each space around
- SL ST to top of beginning CH 2 (65 HDC total)
Rounds 23-28 change to white and continue with 1 HDC in each space
Adults (for a 22-23 inch head)
Here's the free crochet moose beanie pattern for even adults.
Round 1
- CH 3, SL ST to form a ring
- CH 2 (counts as first HDC)
- 9 HDC in ring, SL ST to top of beginning CH 2 (10 HDC total)
Round 2
- CH 2 (counts as first HDC)
- 1 HDC in same space
- 2 HDC in each space around
- SL ST to top of beginning CH 2 (20 HDC total)
Round 3
- CH 2 (counts as first HDC)
- 1 HDC in same space
- 1 HDC in next space
- *2 HDC in next space
- 1 HDC in next space
- Repeat from * all the way around
- SL ST to top of beginning CH 2 (30 HDC total)
Round 4
- CH 2 (counts as first HDC)
- 1 HDC in each space around
- SL ST to top of beginning CH 2 (30 HDC total)
Round 5
- CH 2 (counts as first HDC)
- 1 HDC in same space
- 1 HDC in each of the next 2 spaces
- *2 HDC in next space
- 1 HDC in each of the next 2 spaces
- Repeat from * all the way around
- SL ST to top of beginning CH 2 (40 HDC total)
Round 6
- CH 2 (counts as first HDC)
- 1 HDC in same space
- 1 HDC in each of the next 3 spaces
- *2 HDC in next space
- 1 HDC in each of the next 3 spaces
- Repeat from * all the way around
- SL ST to top of beginning CH 2 (50 HDC total)
Round 7
- CH 2 (counts as first HDC)
- 1 HDC in same space
- 1 HDC in each of the next 4 spaces
- *2 HDC in next space
- 1 HDC in each of the next 4 spaces
- Repeat from * all the way around
- SL ST to top of beginning CH 2 (60 HDC total)
Round 8
- CH 2 (counts as first HDC)
- 1 HDC in same space
- 1 HDC in each of the next 5 spaces
- *2 HDC in next space
- 1 HDC in each of the next 5 spaces
- Repeat from * all the way around
- SL ST to top of beginning CH 2 (70 HDC total)
Done with the crown!
The Sides: Rounds 9-34
(or keep working rounds until the hat is about 9 inches tall)
- CH 2 (counts as first HDC)
- 1 HDC in each space around
- SL ST to top of beginning CH 2 (70 HDC total)
Rounds 30-34 change to white and continue with 1 HDC in each space
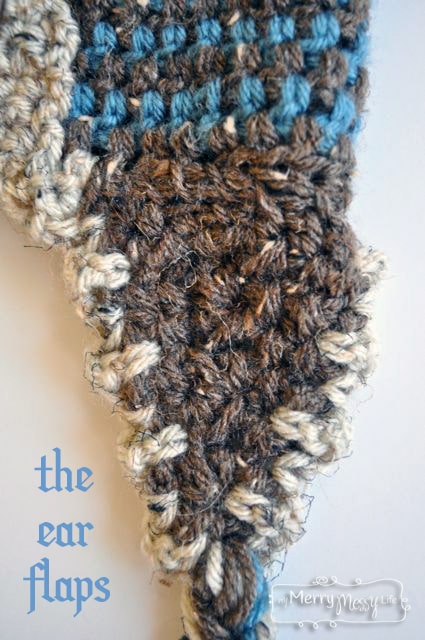
Crochet Hat Ear Flap Pattern
Trick For Sewing On the Face Parts Symmetrically
I have spent many a precious hour sewing and resewing facial parts onto projects before and have found the best and easiest way to do it is to tack all of the pieces onto the hat with sewing pins first. It takes more time up front, but saves lots of frustration and time later!
Knowledge of a half double crochet decrease stitch is necessary to complete the ear flaps for this crochet moose beanie pattern. If you’ve never worked one, here is my complete photo tutorial!
Row 1
- CH 16
- In 3rd CH from hook, work a HDC
- 1 HDC in each CH down (13 HDC total)
Row 2
- CH 2 (counts as first HDC)
- 1 HDC in each of the next 3 spaces
- 1 HDC decrease in the next 2 spaces
- 1 HDC in each of the next 2 spaces
- 1 HDC decrease in the next 2 spaces
- 1 HDC in each of the next 3 spaces (11 HDC total)
Row 3
- CH 2 (counts as first HDC)
- 1 HDC in each of the next 4 spaces
- 1 HDC decrease in the next 2 spaces
- 1 HDC in each of the next 4 spaces (10 HDC total)
Row 4
- CH 2 (counts as first HDC)
- 1 HDC in each of the next 3 spaces
- 1 HDC decrease in the next 2 spaces
- 1 HDC decrease in each of the next 4 spaces (9 HDC total)
Row 5
- CH 2 (counts as first HDC)
- 1 HDC in each of the next 3 spaces
- 1 HDC decrease in the next 2 spaces
- 1 HDC decrease in each of the next 3 spaces (8 HDC total)
Row 6
- CH 2 (counts as first HDC)
- 1 HDC in each of the next 3 spaces
- 1 HDC decrease in the next 2 spaces
- 1 HDC in each of the next 2 spaces (7 HDC total)
Row 7
- CH 2 (counts as first HDC)
- 1 HDC in the next space
- 1 HDC decrease in the next 2 spaces
- 1 HDC in each of the next 3 spaces (6 HDC total)
Row 8
- CH 2 (counts as first HDC)
- 1 HDC in the next space
- 1 HDC decrease in the next 2 spaces
- 1 HDC in each of the next 2 spaces (5 HDC total)
Row 9
- CH 2 (counts as first HDC)
- 1 HDC decrease in the next 2 spaces
- 1 HDC in each of the next 2 spaces (4 HDC total)
Row 10
- CH 2 (counts as first HDC)
- 1 HDC decrease in the next 2 spaces
- 1 HDC in the last space (3 HDC total)
Row 11
- CH 2
- 1 HDC decrease in the next 2 spaces
Finish off
The Pucker Stitch Border
Once the ear flaps are sewn on, I crocheted a pucker stitch border around the entire hat.
- SL ST anywhere you want, CH 1
- *Treble crochet in the next stitch
- SC in the next
- Repeat all the way around
- SL ST to the CH 1 and fasten off
Crochet Braids Tutorial
Here's the simple tutorial to make the braids for this crochet moose beanie pattern.
Take 10 strands of yarn and cut them 24 inches long
Fold them in half as a group and knot onto the end of 1 ear flap by inserting the loop into a space at the point of the flap and pull the ends of the strands through the loop.
Divide evenly into 3 groups and braid. Tie off the end of the braid with a strand of yarn and trim the ends so they are even.
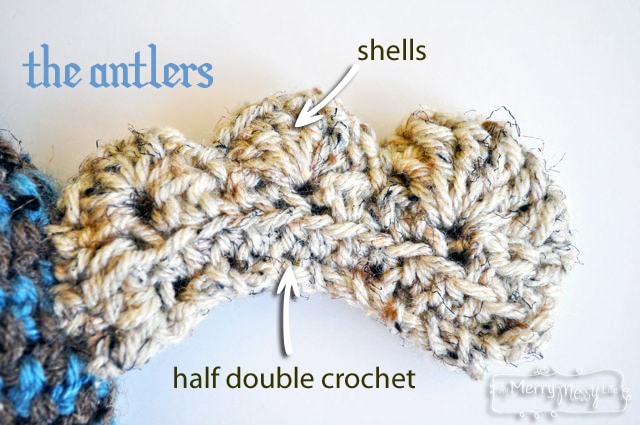
The Antlers
Switch to an I hook
- CH 16
- In 3rd CH from hook, work 1 HDC
- Work 1 HDC in each CH all the way down (for a more interesting look, do BLO (back loop only)). 14 total total
- Row 2: CH 2, 1 HDC in each st (BLO if you wish) 14 HDC total
- Row 3 – The Shells – CH 1, in the 4th space, work 6 TR (treble crochet)
- Skip 1 space, SL ST in next space, skip 1 space
- Shell 2: Work 6 DC in next space
- Skip 1 space, SL ST in next space, skip 1 space
- Shell 3: Work 6 HDC
- SK 1 SP, SL ST in next 4
Make 4 of these and whip stitch 2 together. This makes them stiff so they stick out from the head like real antlers.
Moose Nose
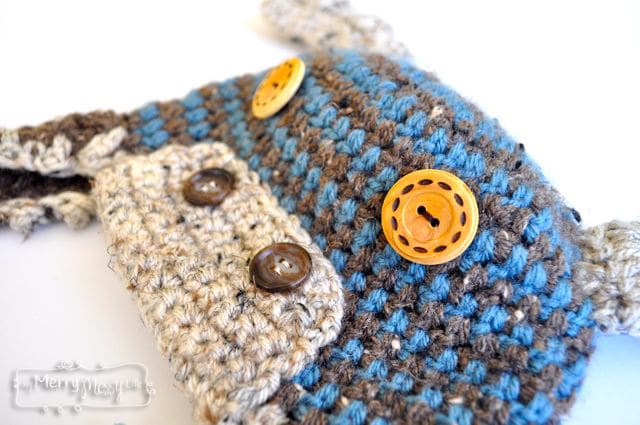
- With the hat pointed down, working on the inside of the hat, on the pucker stitch border. For each size it will be a different starting point, but it is 15 stitches wide, so find the middle point from that.
- SL ST onto the hat right next to one of the ear flaps, CH 2
- Work 1 HDC in each of the next 14 spaces (15 total, including the CH 2)
- Row 2: CH 2, work 1 HDC in each space down (15 total, including the CH 2)
- Rows 3-8, repeat row 2
- Row 9: CH 2, skip the next space, work 1 HDC in each of the next 12 spaces, skip the last space, SL ST and fasten off
Eyes and Nostrils are buttons from….guess where….Wal-Mart! Otherwise, you can crochet them on by making small circles, like I did for the fox hat.
Be sure to check out the other hats in this series, the Crochet Fox Beanie and the Crochet Lion Beanie!
[optin-monster slug=”xs2yggdkacqf5ww9fqqm”]
I love your work. Thank you for sharing your patterns for little ones and up. I am certain these will be loved by all of my grandchildren and great-grandchildren.
Thank you Teresa! I hope your children and great-grandchildren will love the beautiful things you will make from the patterns, too!
Thank you for the pattern, put you do not indicate which color to start with nor when to change colors. Would you be able to update pattern for the toddler size to indicate that. I would like to make the crochet moose beanie
Thank you
Thanks for the pattern but you didn’t indicate what color to start with or want to change colors
Could you update your pattern I would like the crocheted most beanie
Thank you
Thanks for the pattern I see that you don’t indicate what color to start with or when to change colors
Could you please help me please I would like the crocheted most beanie
Thank you
Hi Debra! So to make the hat, you alternate between blue and brown. Doesn’t matter which one you start with, just switch colors on each row. Let me know if you need any more help!
Thank you for this free pattern. It is delightful. Having crocheted for over 50 years I’m always looking for unique AND fun patterns. This pattern definitely fits the bi!!.