Crochet Heart Triangle Pattern – Free Crochet Pattern
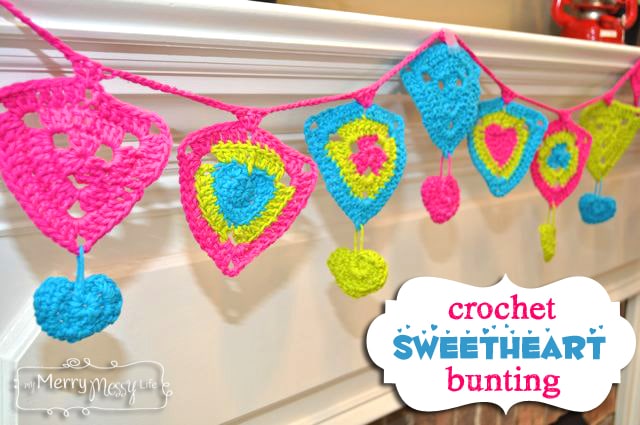
A sweet crochet heart triangle pattern that's perfect to make a bunting for a girl's room, Valentine's Day, or even a baby's room! This was done as part of a crochet-a-long I had on the blog, where we made four Lacy Granny Triangles and eight simple Crochet Hearts and combined them all with this pattern to make a bunting for Valentine's Day.

To crochet the heart, go to the pattern page where you can see the pattern and a full photo tutorial.
The full photo tutorial is below the pattern.
Crochet Heart Triangle
See my Terms of Use to know how to use this pattern.
Abbreviations
- CH = chain
- DC = double crochet
- SL ST = slip stitch
- SP = space
- BLO = back loop only
- SC = single crochet
Materials
- Hook: H
- Tapestry needle to sew in the tails
- Worsted weight yarn (I used Sugar'n Cream in cotton, however I actually suggest using acrylic or an acrylic blend because it's more stretchy and the pattern will look cleaner. Cotton does not stretch back to it's original shape). So here are the yarns I suggest instead:
- Red Heart Super Saver Yarn in Shocking Pink
- Red Heart Super Saver Yarn in Turqua
- Red Heart Super Saver Yarn in Lime
The Pattern
Round 1
- Taking one of the hearts, work a CH 3 at the bottom of it, in the point, between the 2 DC's of the heart
- 1 DC in each of the next 6 sp's BLO
- Work a corner in the next space {2 DC, CH 3, 2 DC}
- 1 DC in the next sp BLO
- 2 DC in the next sp BLO
- SK the next 2 sp's (where heart dips down, the SC's)
- 2 DC in the next sp
- 1 DC in the next sp
- Work a corner in the next space {2 DC, CH 3, 2 DC}
- (Last side) 1 DC in each of the next 7 sp's BLO
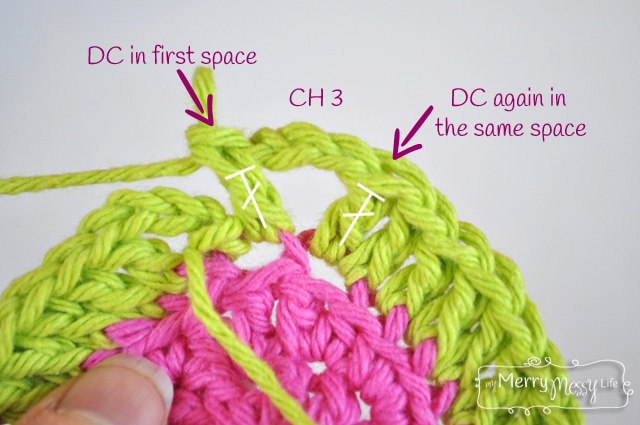
- DC again in the same sp
- CH 3
- DC in the first sp of the round BLO
- SL ST to the top of the first CH 3
- Fasten off or continuing working below with the same color (it is different if keeping the same color)
Round 2 – if changing colors
- SL ST & CH 3 at the bottom of the triangle (at the point of the heart)
- 2 DC in same sp as CH 3 BLO
- 1 DC in each of the next 10 sp's
- Work a corner in the next space {3 DC, CH 3, 3 DC}
- (Top) 1 DC in ea of the next 10 sp's BLO
- Work a corner in the next space {3 DC, CH 3, 3 DC}
- (Side) 1 DC in ea of the next 10 sp's BLO
- In that same last sp, 2 more DC's BLO
- CH 3, SL ST to the top of the first CH 3
- Fasten off, and you're done!
Round 2 – if keeping the same color (Thank You to Autumn from Season Girl Stitches who figured this out to help you all! I have not tried this yet, so I'm not sure how it works, but her work is beautiful, so I'm trusting her advice.)
- CH 3
- 1 DC in each of the next 8 sp's BLO
- Work a corner {3 DC, CH 3, 3 DC}
- 1 DC in each of the next 10 sp's BLO
- Work a corner {3 DC, CH 3, 3 DC}
- 1 DC in each of the next 9 sp's BLO
- 2 DC, ch 3, 2 DC in CH 3 space
- 1 DC in same space as starting CH 3 BLO
- SL ST to the top of the starting CH 3
Starting at the bottom of the heart, in between the two double crochets, work a chain 3. Then, in the back spaces only (BLO), work 1 double crochet in each space of the side, 6 total. Then, we work on the corner. Work 2 double crochet in the next space (still back loop only), chain 3, then work 2 more double crochets all in the same space.

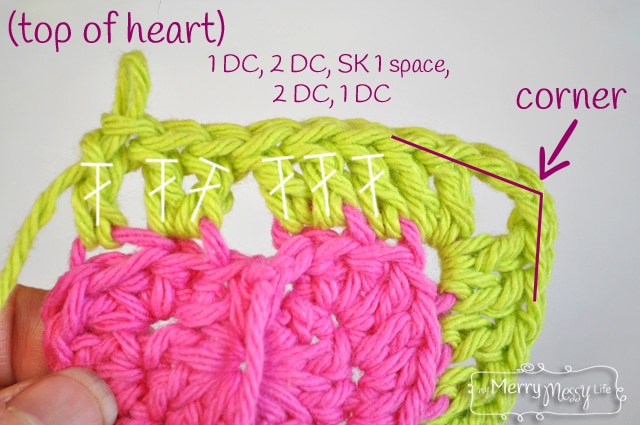
Now working at the top of the heart, we work 1 double crochet in the next space. Then, two double crochets in the next space. Skip the space where the heart dips down, or you could also work 1 double crochet in that space for a different look. Then, work 2 double crochet in the next space, and 1 double crochet in the last space of the top.
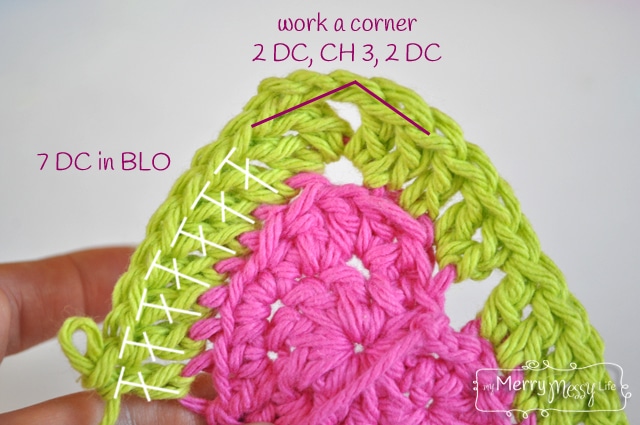
Now we're ready to work the third corner. It's the same as the second – 2 double crochet, chain 3, 2 double crochet all in the chain 3 space of the corner below. Then, we work the last side. Work 1 double crochet in each space below, back loop only (BLO), 7 total.
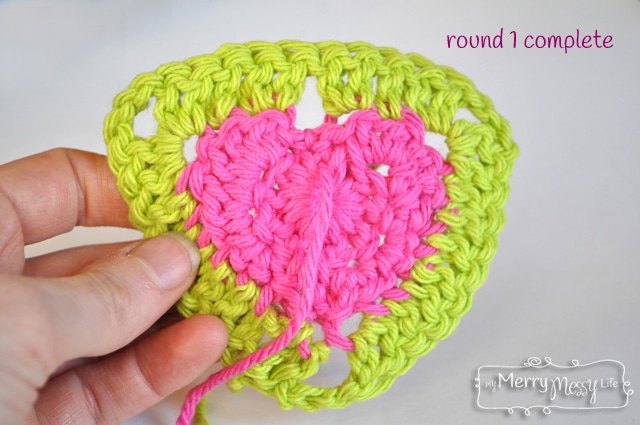
To finish off the first round, work another double crochet in that same last space, then chain 3, and work a double crochet in the very first space where you started the round. Fasten off and cut the yarn.
Here's what round 1 should look like!
Starting at the bottom of the heart again, where you left off, work a chain 3. Then work 2 double crochets in that same space. Working on the first side, work 1 double crochet in each of the next 10 spaces, back loop only.

Now we're going to work another corner. Work 3 double crochets, chain 3, then 3 more double crochets all in the same space. Then, for the top of the heart, work 1 double crochet in each of the next 10 spaces, back loop only.
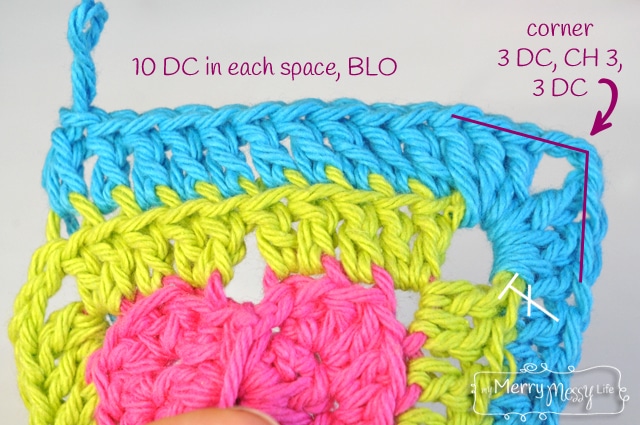
Work another corner – 3 double crochets, chain 3, 3 double crochets all in the same space. Then, work the last side – 10 double crochets in each space, back loop only. The last step is not pictured – but work 2 more double crochets in that same last space, chain 3, and slip stitch to the top of the first chain 3. Fasten off and you're done!
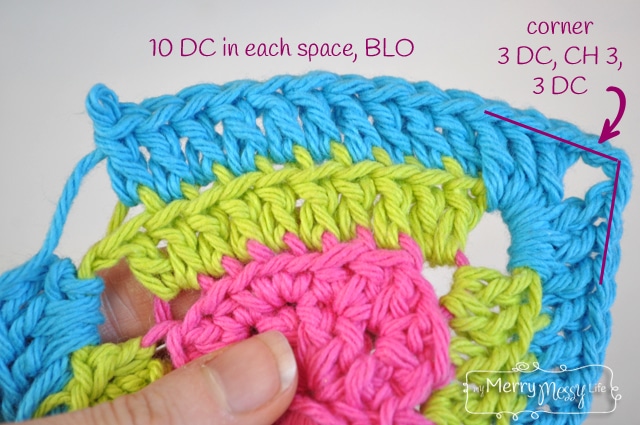
The last step is not pictured – but work 2 more double crochets in that same last space, chain 3, and slip stitch to the top of the first chain 3. Fasten off and you're done!
Make sure you see the other patterns in this series to make a crochet sweetheart bunting!

[optin-monster slug=”xs2yggdkacqf5ww9fqqm”]